My DIY hall bathroom makeover is really coming along, and I’m excited to share the latest progress with you–especially because this is another one of those things I’ve been thinking about for a few years now! After tackling replacing the vanity a few weeks ago, I alluded to the fact that I also had to update the floor at the same time. My plan was to install peel-and-stick vinyl tiles over the existing tiled floor–which looked like this:

I was never a fan of the 80s beige-and-brown tile, which looked even more outdated once the new toilet and vanity were in. I read up on installing vinyl over ceramic tile, and of course most experts would say it is better to demo the ceramic tile before installing the vinyl tile. But I was not up for that because 1) I have very little time these days and that would take WAY longer and 2) we plan to re-do this bathroom completely in a few years and 3) I was just sort of curious if it would work! I found a very helpful set of instructions that gave me the confidence to give it a go–and I’m glad I did!

Before I set to work cutting and laying the tiles, I first applied floor leveling compound to ALL the grout lines. The surface needed to be completely flush–otherwise the tiles would get indented overtime where the grout lines were under the tile. I used a putty knife to scrape the compound into all the crevices and smoothed it out before it dried. This was definitely a pretty boring activity, let me tell you! And I was definitely tired when I was doing this because it got way less smooth towards the end. You can see in this pic what it looked like with the compound applied to the grout lines–not very pretty!

The areas I did when tired were not very smooth, so once everything was dry I had to do a fair amount of sanding to make sure none of the dried cement-like compound stuck up. If you try this I definitely think it is worth it to take your time and make sure that you go back over everything as you go to make sure to smooth everything out and remove any excess compound (lesson learned!).
Once everything was dried and sanded, I started cutting and laying the tiles. I was hoping to get the same tiles as we used on our back staircase, but alas, they no longer make that particular color of tile. My daughter came to Home Depot with me and helped me pick out these instead. They are much cooler and more gray, but I think they still look nice. Here you can see how things were looking as I made progress getting the tiles down:
 Of course the most annoying part was cutting all the custom cuts–especially around the toilet. But I eventually got a pretty good system in place for making tile templates with catalog covers for the trickier spots. In retrospect, I think heavy-duty scrapbook paper would have worked better! Again…lesson learned!
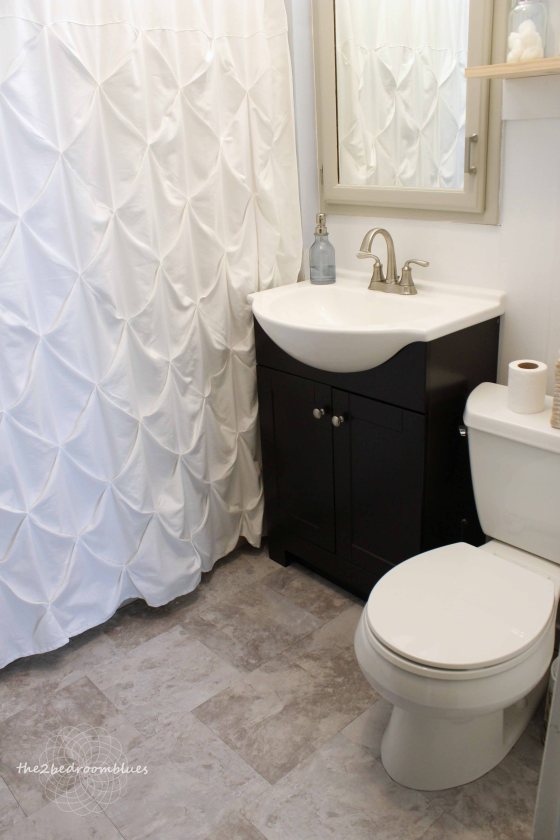
Now, with the new vanity installed AND the new floor, this room is really starting to look dramatically different! Here’s what it looks like now:
And a quick walk down memory lane…

Next up I’ll be filling in the board and batten on the wall, installing fixtures, and doing some decorating. Stay tuned for more updates soon!
Cheers,
G


Pingback: Tiny bathroom DIY remodel reveal! |