Holiday decorating in a small space

So yes, the holidays are over and no, this post didn’t get up before the holidays, but as this was our last holiday season here at our condo, I wanted to share how we decorated this year in case it is useful for others working with a small space during the holidays.

I have two main pieces of advice for anyone decorating for the holidays in a small home–especially an apartment/condo where you don’t have the luxury of being able to stash extra stuff in a basement or garage.

1. Keep it simple.

2. Use your existing color palette.

Keep it simple: means focus your decorating on just a couple of spots in your home.  Not every inch of your space needs to be decked out.  Usually the living room is the one where you spend the most time, especially during the holidays, so that’s the one that will usually get the most attention.  For other rooms, a small nod is enough to bring in the holidays spirit–some holiday towels in the kitchen and bathroom, a bowl of ornaments in the dining room, perhaps a vase of poinsettias for the office or bedroom, and you’re done.  If you want to do a Christmas tree, you could try a tabletop model if your space is limited, or do what we do–we don’t put all the lower branches on our artificial tree so it fits more snugly into the corner and takes up way less space in our living room!

Use your existing color palette: Just because traditional Christmas color are usually red and green doesn’t mean you have to force your home to adorn those shades during the holidays–especially if these choices will severely clash with your existing decor.  I always encourage focusing the color scheme on shiny neutrals like gold and silver as well as white, cream, and gray, which are a nod to the cold, snowy weather outside (unless you live in a hot climate of course!).  Then decorate using the existing color palette in each room!  Craft stores like Michaels sell glass ball ornaments in almost every shade under the sun, so if you want a sparkly fuchsia tree, then go for it if that’s what will look most at home in your space. 

Here’s what I did this year here at 2BB.  I kept it simple by focusing my decorating in the living room, and then only in three spots–the Christmas tree:

CIMG3885

  the entertainment center:

CIMG3895and the console table behind the couch:

CIMG3878

You can see that I used the existing color scheme of blues and aquas and shimmery silvers and golds.  For the setup on the console table I just used what we already had, including our existing silver-framed photos, the sweater vases I made last year, some votive holders and other random mercury glass I had around the house, some flameless candles, and some glass ball ornaments.

CIMG3909

Oh, and those branches you see on the console?

CIMG3907Yep…those are some of the extra branches we didn’t put on the back of the tree!  I used the rest of the branches in a few other spots in the house and they worked great!

So there’s my advice and few quick pics of our holiday decorating this (okay, last) year.  Of course everything will be different when the holidays roll around this year because we’ll be in the new house, but I’m sure I’ll use many of the same ideas–hopefully with a new twist!

What’s your favorite holiday decorating tip?

Cheers,

G

Finding space: hallway bookcases

Like many people not on the e-reader bandwagon yet, DH and I have a lot of books.  In addition to being a graduate student, DH is also just a avid reader in general.  So we have lots of books–or at least it feels like a lot in our tiny 2-bedroom.  I wanted to share one of my favorite past projects, which we completed several years ago, that helped us turn unused space into storage for our large-ish library: hallway bookcases!

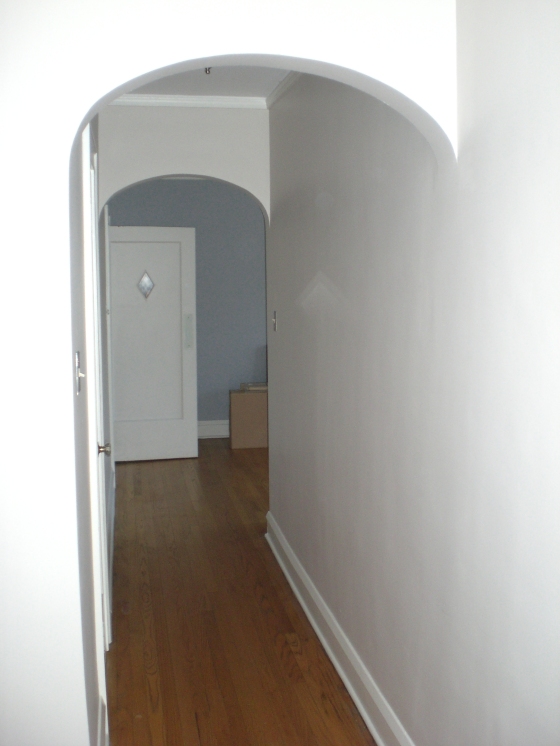
I’ve always loved built-ins for their beauty and ability to fit exactly into a space, so when the idea came to me to turn our regular boring hallway into a wall of bookshelves, I was very excited.  Here’s the hall we were dealing with when we first moved in:

At first I thought we would do floor to ceiling shelves because I thought that would maximize the space best.  However, once we measured everything out, we realized that the hall was not especially wide, and we were worried about being able to eventually move furniture out.  Plus, we thought it might feel a bit imposing to have gigantically tall bookcases in a short hallway.

We had to keep a few things in mind when figuring out this project.  We wanted to make sure that the built-ins didn’t feel out of place or too imposing, and we needed to make sure we could still easily open the closet door still.  I was a little worried that my dream wouldn’t be able to become reality, but after measuring and re-measuring, we figured out that we could do a very narrow set of bookcases (just a bit deeper than paperback size) and still open the door–and as long as we kept it just above waist height, we decided it wouldn’t feel too closed-in.

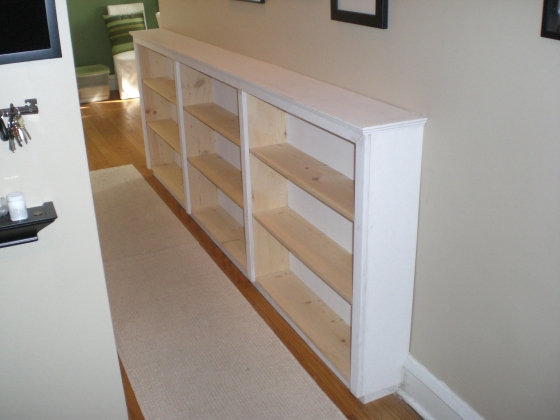
We had a local bookshelf builder custom-build and install the bookcases.  It actually cost less than we thought it would–and we saved money by doing all the painting ourselves (just like with the nursery built-ins).  Here’s what they looked after they were installed, but before we got to priming and painting them:

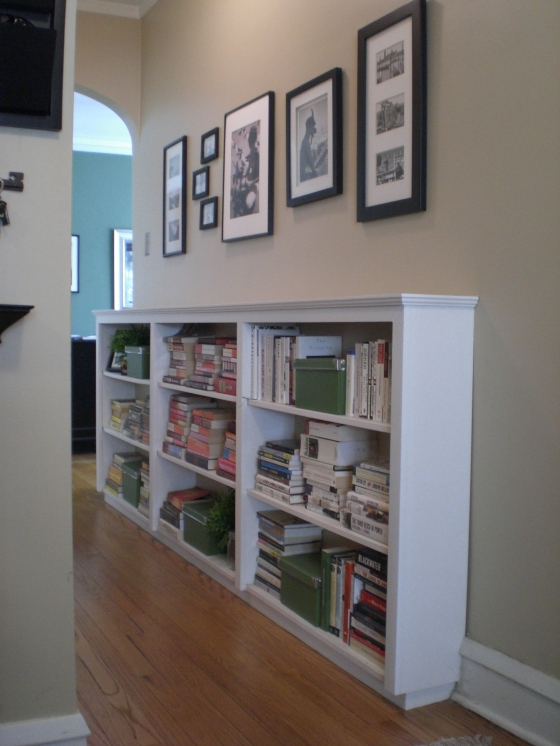
We painted them white to match the trim in the rest of the house, and painted the backs of the bookcases the same color as the wall to help them recede even more.  Once they were painted, we were able to load them up with all kinds of books and other things (things that aren’t too deep, that is!).  We’ve been really pleased ever since they went in.  I took this pic just the other day:

Not only do they store tons of books, but the lovely top gives us a bit of horizontal space to set things on.  We try to keep it clear, but from time to time it is helpful to have the space as a place to sort mail or hold things temporarily until they get put back in their proper place.

Thanks checking out one of my favorite space-finding projects to date!  What do you think?  Have you ever tried something similar? Do you also crave built-ins everywhere in your home?

Media cabinet makeover: lightening up and finding space for new equipment

The media cabinet in our tiny 2bedroom has a tall order to fill–it must hold our TV, DVD player, VCR (I know, I know), books, DVDs, and of course, plenty of DH’s CDs.  We love the unit itself, which we purchased from IKEA when we first moved here in 2007, and it has already seen some changes through the years.  However, I never figured out the best way to maximize the space.  Here’s a pic of what I’m dealing with on a typical, not-at-all cleaned up day:

Right now, I’m just talking about the media cabinet (that piece in the middle with the TV on it).  Don’t even get me started on the bookcases on either side.  That’s a hurdle for another day.  Here’s a closer up pic of the actual media cabinet before I started this makeover:Not exactly horrible, not not perfect either.  My main complaint has been the storage “boxes.”  We were never able to find anything in our price range that filled out the space on the six shelves very well.  Most of what we saw was either much too small or way too big.  We eventually got tired of looking for actual baskets and ended up using pull-out fabric bins (meant for one of those hanging closet organizers), which I later covered in the fabric you see above.  However, the bins themselves are actually pretty flimsy as they were meant to store clothes, not DVDs or CDs.  DH had reinforced them with cardboard, but they still never worked great.  And they don’t have handles.  Plus, they just felt waaaaay too dark with the new, lighter, color scheme for the living room (read more about that here and here):
 
Adding to my design dilemma was the fact that DH has taken up another music-related hobby (in addition to the CD habit mentioned here): collecting vinyl.  For his birthday last year we purchased a turntable for him.  Even though he’s super excited about his new piece of equipment (and growing cache of LPs) we never really found a good spot for the unit itsel.  It has been hanging out in the nursery since we purchased it, but it is of limited use to him there because much of the music he wants to listen is not exactly baby-friendly, so he’d prefer to have the turntable in the living room so he can use it during her naps.  Of course, we decided this made sense months ago, but we only recently got around to making this dream a reality.
 
We started this project the way I suggest you start any re-organization or re-design project: go through and pare down your stuff.  Before we purchased anything or moved anything around, we found some extra space (what I like to call “wiggle room”) by going through our DVD collection and getting rid of a bunch of box sets and movies we never re-watch.  At first we were having a difficult time parting with some of our favorite TV box sets, but once we checked and saw that we could get them streaming with our Netflix subscription, it was much easier to let them go.
 
I then started shopping around for new baskets or bins to use in place of the fabric closet-organizing boxes.  I finally found some baskets on sale at Container Store that were perfect.  Getting all six was  a little pricy, but they fit great, are VERY sturdy, have handles, and are really beautiful.
 
Finally, we had to figure out how to incorporate the turntable into the open space in the middle section of the media cabinet:
We knew we could easily part with the VCR because we had previously parted with all our VHS tapes during the office-to-nursery conversion, so we quickly found it a new home using our local Freecycle Network.  We also were able to part with a few of the oversize books that we had stacked in there–some of which DH had already marked as ones to get rid of but just hadn’t followed through with getting them out of the house!
 
Once we had pared down our collections of CDs, DVDs, books, and electronics, we set to work on fitting in the record player.  Luckily, this being an IKEA piece, the shelves were highly adjustable.  After trying a few combinations we found one that worked very well.  And an added bonus?  I have my charging station back!  I’d been trying for close to a year to find it a new home, but it wasn’t until we were re-arranging the media cabinet that I found that this would also fit.  Previously it lived in our office on DH’s desk, back before our office became the nursery, and it was a really nice place to charge our electronic devices (cell phones, camera, video camera, etc.).  Here it is back in its old home:
 
Anyway, enough waiting.  Here’s our newly re-designed, re-basketed turntable-holding media cabinet:

Obviously I still need to deal with that cord clutter in back (one of my New Years organizing resolutions, after all!).  There is actually a pretty good built-in cord curbing system as part of this piece (hooray IKEA!), but it does require pulling the whole thing out from the wall and re-routing some of the cords and wires and is definitely a two-person job.  DH has promised we can do this soon.  I will hold him to that.

Here’s the before and after side-by-side, just for fun:


What do you think?  Have you recently found space for a turntable?  Do you also also own a VCR you never use?  Do you also love baskets on sale at the Container Store?


Finding space: our closet laundry room

One of the joys of living in the city is that you often miss out on in-unit laundry.  Although newer rehabs are making sure to include laundry, but our building was last rehabbed in 1980, before in-unit laundry was considered essential.   In-unit laundry was on our “must have” list when we were condo shopping, but this was before the housing marked imploded and there weren’t many options out there that fit our needs.  So we settled on a unit that was billed as “laundry on-site, in-unit laundry easily installed.”   Since we loved most things about the condo, we decided that as long as installing laundry was an option, then we were happy.

We were accustomed to hauling loads of laundry down to a communal laundry room when we were renting when we were first married and living in Minneapolis. So we didn’t mind continuing that tradition for a time.  But what we didn’t realize is that the laundry room in our building isn’t accessible unless you go outside.  Seriously.  Maybe not such a huge deal in the summer but come winter, that meant hauling huge laundry baskets of clothing up and down two very steep, often snowy or icy, flights of stairs, walking across a snowy courtyard, and down into the basement laundry room.  It wasn’t fun.  Especially for DH, who did about 90% of the laundry (despite that it is one chore I actually enjoy) just because he was home during the day and if we waited until evening or the weekend, the machines were always in use.

So when we started thinking and talking about having a baby, we realized that our laundry needs would be greatly increased–especially since we wanted to do cloth diapers.  We decided this meant it was time to figure out how easily installed in-unit laundry would really be.  Okay, so this back story is getting pretty long and probably you just want to know what we did and see pictures, so here’s the Cliff’s Notes version.  I had always envisioned a traditional stacked washer and dryer.  However, on consultation with our contractor, we realized that because the only closet that had the right access to the pipes was not on an outside wall, we’d have some major work to do to properly vent the dryer.  He suggested we consider the European-style washer/dryer combo, which doesn’t require venting.  I was very skeptical as I had seen these in several of the condos we had looked at, but our realtor had said she hadn’t heard anything good about them so we assumed they were horrible.  But I did more searching online and learned that when used properly, there were actually some advantages to them over traditional washer/dryers (they are gentler on your clothes, for example).  I knew that it would take much longer than a traditional gas dryer to dry a load of laundry, but I already was air drying lots of laundry so that didn’t seem that huge of a deal.  Plus, with the alternative being way more expensive (and potentially more risky) we decided to go for it and just get one with good online reviews and hope for the best.  We purchased an LG.  She’s pretty.

While we were waiting for the washer/dryer to be delivered, we went to work planning the rest of the space.  There was actually minimal work for our contractor in the actual closet, but he did have to open up the wall in the bathroom in order to get all the pipes properly hooked up.  Luckily we were planning to install a new sink at the same time, so we did it all together and it worked out great.  More about that another time.  The closet that we were going to put the laundry room in was j-u-s-t big enough to house the unit, which is roughly the size of a standard dishwasher (apparently in Europe many people have their laundry in the kitchen!).  When we started the closet was laid out like this (sorry for no before pic–this was pre-2BB days!):

In addition to actually installing the washing machine, we had our contractor remove some of the shelves, and adjust a few others.  The main difference now is that we installed a hanging rod, which is perfect for hanging laundry to dry since we only use the dryer setting for about half our laundry.  The new layout looks like this:

We used paint left over from painting the living room to make it feel like an actual room that was part of our house instead of just a closet.   Here’s what it looks like on a non-laundry day:

Of course, I’ve added a few finishing touches, like:

  • the mini hooks in the far (great for hanging stain remover and lingerie bags)
  • two nesting laundry baskets (which is also where we collect cleaning rags and kitchen towels that need to be washed)
  • a variety of different hangers for air-drying
  • a great multi-hook hanger from the Container Store (which is perfect for air drying anything small like trouser socks and diaper covers)
  • our ironing board
  • old towels for line-dry items
  • a sign that says “laundry” that I painted a long time ago

Here’s pic of this hard-working “room” on a laundry day:

And here were are, two years later, and we couldn’t be happier with our decision.  I can’t even begin to explain how much more convenient this is.  The room is centrally located in our home so it is very easy to check on the laundry.  Throwing in a load takes almost no time at all since it is close to both bedrooms.  At first we were concerned that hanging stuff to dry in the closet would cause mildew, but we haven’t had an issue with this at all for two reasons.  First, we usually will run a load with a dry cycle while there is wet laundry hanging up, and the closet gets nice and toasty and dry, thus also speeding the drying time of the hanging items.  Second, if were not planning to run a dry cycle, we just leave the door open a bit to help keep air circulating.  The other great thing about a combo washing machine/dryer is that you can set the entire cycle up front–no transerring the load from the washer to the dryer.  I often will run a load with a dry cycle (which can take 4 hours) overnight.  I just put everything in, add the soap, select the washing and drying settings, and by morning I have clean, dry laundry waiting for me!

What do you think?  Have you installed one of these all-in-one units in your home?  Are you thinking about it?  Do you have any questions?  Please share!